|
So last week I came across this recipe, which has to be one of those tastiest clean recipes I have ever tried!! This recipe is dairy free, gluten free and vegan so EVERYONE can enjoy it. I didn't actually take any photos of me making it as I was unsure how it would turn out but boy oh boy...is this a goodie!! Ingredients 2 cups desiccated coconut 1/3 cup maple syrup (if you don't have any you can use golden syrup) 1/2 cup coconut oil 1 cup coconut milk Pinch of salt Splash of vanilla essence Dark Chocolate and a little extra coconut oil for icing Line a tray with baking paper, this tray can be any size depending on if you want them to be thicker or thinner. I used a tray that was around 30cm by 20cm and i just moulded it into a square shape inside that. If your coconut oil is a little hard, pop it in a bowl and microwave for 10-15 seconds just to soften slightly. Put all the ingredients (aside from chocolate and extra coconut oil for icing) inside a bowl a mix well. If your mixture is too dry then add a touch more coconut milk, if its too wet add a touch more desiccated coconut. You'll want the texture to be thick enough to mould and hold its form in your tray. You then want to put it all into your lined tray and mould to the shape. I then lightly put the lines where I'll be cutting it later with a knife into the mould. Then put it in the freezer for at least 30mins. Once out of the freezer you can cut it into the shapes your drew on earlier. Melt the chocolate in a bowl (I find the easiest way of doing this is filling a pot 3/4 with boiling water then putting the chocolate inside a heat proof container and resting this on top of the pot, this way it never burns!). Once the chocolate has almost melted (i used around half a block) put about a teaspoon of coconut oil into it and mix well. You'll notice the mixture becomes more watery, this makes it ALOT easier to ice these bounty bars as they can be quite brittle. You then want to ice all the bounty bars and put them on some more baking paper. I put them in the freezer to set the chocolate quicker. After around 25mins I pulled them out and put them into a container. These seem like such a guilty treat but are more of less completely clean. These also freeze beautifully so make an extra couple of batches you can take out at events or your next gathering!! Enjoy Nicole xx 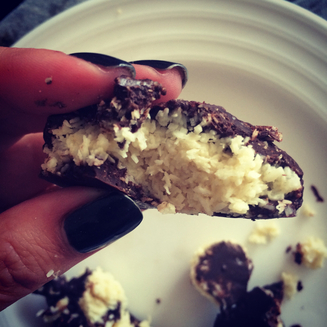
0 Comments
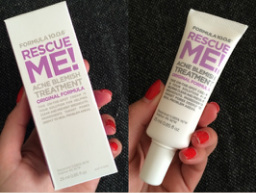 With the weather slowly getting a little hotter the changes in the skin begin! Around this time my skin always starts getting oily which definitely doesn't help with clear skin. A little whole ago I tried the Formula 10.0.6 face masks and loved them. So I did a little research on the range and saw an Acne Blemish Treatment. These products are so well priced I figured I've got nothing to loose. So this product is described as an 'on the spot cream which is your solution for helping clear and prevent breakouts.' I don't typically have acne probe skin but the heat usually brings out a couple so if I can avoid that..I will! This product comes in a little 25ml tube and I have to say I am drawn to the packaging. It's clean and fresh looking. This product smells a little talcum powder-y, it is a light gel like texture. Basically you just apply it once or twice a day to any pimple probe areas of your face. If you have any broken skin you will feel a slight sting, nothing unbearable though. It is a light gel like cream and applys really smoothly. I have been applying it to my chin and nose for the last two weeks and my skin has cleared so much. I'm actually surprised! It has cleared some scarring slightly and no new blemishes have shown up! It has helped with the oilyness and I'm just loving it. I do want to say again that I don't have acne, my main issue is scarring, oilyness and a couple of blemishes and this is working perfectly for that. I would say it would help acne a lot and at $15.00 it's definitely worth a try! Nicole xx For the second Top 5 I wanted to do something non beauty related. I've recently been growing my DVD collection so I thought I would share my Top 5 Movies! 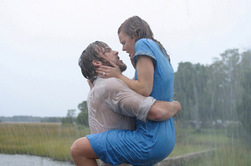 These are in no particular order but he first one I'll talk about is The Notebook. Ryan Gosling. I don't have to continue but I will! This movie is the sweetest love story and I love the way the movie is filmed. It's beautiful and tasteful and tells the story perfectly. Ryan Gosling is the perfect Noah and Rachel McAdams is the perfect Allie. If you haven't seen this movie I highly recommend it..but don't forget a box of tissues!! This movie is also based on a book by Nicholas Sparks which is amazing so if you don't want to watch the movie definitely read the book!  One of my all time favourites is The Lion King. I've loved this since childhood and everytime I watch it (even as an adult) I still absolutely love it. Incase you haven't seen it it's basically about a lion pride that's leader is killed by his brother, the son of the leader is lead to believe that he kills his father so runs away. It follows his journey of growing into an adult lion and all the friends he makes along the way.  A new favourite is The Great Gatsby, this movie is amazing!! The costumes, hair and make up are incredible and the actors are brilliant. It's more or less an action/drama with a love story subtly chucked in there (the love story becomes more obvious as the movie progresses!). It's about a man who falls in love with a woman but they basically fall out of touch for different reasons. She meets another man and marries, it then follows Gatsbys journey to trying to win her back. Even though it's based around a love story it isn't the main focus of the film (for the most part) so men and women will love this movie.  A movie I absolutely love in the first Sex and the City Movie. I love the series so the movie was just an extension of that! If you haven't seen the series, SATC is about four woman who are best friends living in New York who are going through life (and men!) and it pretty much just follows their journeys from single woman to married with children. This movie is so funny and has some really sad parts too. The fashion, hair and make up is phenomenal so if you love everything fashion then this alone would be a great reason to watch.  Lastly is The Hunger Games, this is a newer favourite as well but I just love the concept of these movies. The story basically is that all the poor people love in districts..the rich live in the capital. Each year a boy and girl from each district is chosen to pretty much fight against children from all the other districts until only one survives. This may sound terrible but it's a really good movie! It follows one girls journey through it all and how she survives it. This movie has a bit of action, blood an guts and of course a love story.
There is my Top 5 movies for the mean while! If you have any recommendations for me please just pop them below Nicole xx 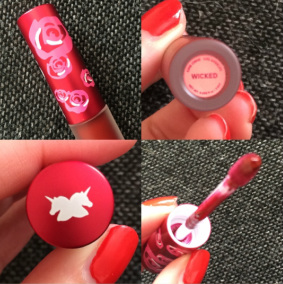 I've always wanted to try Lime Crime but just never gotten around to buying it. I love the packaging and the colour range, they offer something so different but still pretty wearable. When I saw the new Velvetines collection I knew I needed one! The new collection has three colours and is called the Witches collection. The colours are a black, deep red and a brown with a hint of red. The idea behind the Velvetines is that they are a liquid lipstick that dry completely matte. They are transfer proof, touch proof and long wearing. I decided on the deep red. Firstly this lipstick smells amazing!! Like sweet caramel almost. They have a standard lip applicator which I think makes a pretty easy application. If you are new to lipstick I recommend a lip liner though. The product it self is very pigmented and I applied one layer and worked it in until it was even. I didn't have to re-dip the applicator for more product there was more than enough. It took a couple of minutes to dry and was completely matte and didn't have a dry feel to them. Around five hours later I had lunch and this did take a little of the product off but nothing that couldn't have been easily touched up. It did begin to feel pretty dry though so I used a light lip balm over it which did lift more of the product. Instead of touching up with the lipstick I used a normal deep red lipstick and it looked fine. All up it lasted around seven hours before I took it off. This product is really long wearing and the colour is beautiful, I just suggest that you pick what you eat carefully! I had sushi and the soy sauce was just too oily for the lipstick so shifted it more than what other food would. I do highly recommend them however! If you have naturally dry lips just ensure you apply lip balm at least 30mins before applying. Nicole xx 
This skirt is my new obsession (come ooon Summer!) and I've been having so much fun styling it! This skirt is a skater style with an elastic waist and depending on where you wear it, it can be from just above the knee to mid thigh. 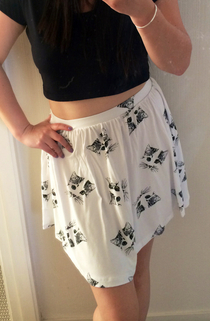 My favourite way of styling it has to be with a crop top. I tried tucking tops into it and wearing loose jumpers over it but everything was just too overwhelming. Because the skirt is a skater style it's only fitting on the waist band and loose and flowy everywhere else. Because of this if you wear something loose with it, it just makes you appear bigger then you are. I wear this skirt pretty high because I quite literally have no waist. I find if I wear it high the band of the skirt gives the appearance of a waist while the rest of the skirt just skims past the hips and tops of thighs and ends at a flattering point. I think the crop top being more on the fitting side definitely gives the body more shape and compliments this skirt perfectly. This crop top is just a plain black t shirt style crop that I picked up from Supre, I sized up in this so it would be looser everywhere but still gives shape. It is made from cotton and elastine and I like this particular mix because I find they wear and wash really well and don't loose their shape as quick as other cotton blends do. The other way I style this is a plain black long sleeve crop. I haven't tried it with any white tops or coloured tops but I think they would work really well. The cat has a little bit of blue, green, red and yellow in it's eyes so your could pick up on any of those colours and they would work really well. Let me know how you would style this skirt, I would love some more inspiration and ideas Nicole xx 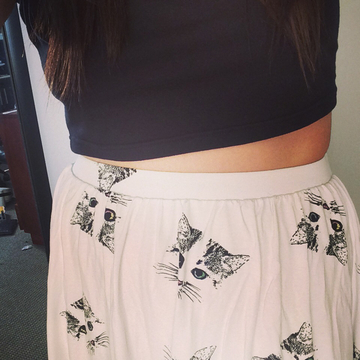
I thought I would do a little post on my latest photoshoot. I recently got some of the photos back from the photographer so I thought it would be fun to let you guys see them! This was a photoshoot for Bettie Monroe which is a New Zealand boutique. The model was a gorgeous local girl name Nicole. She was absolutely fantastic to work on and work with. To create her look we went with a full coverage HD foundation. I used this so we would cover all imperfections and so that there would be no flash back when the photos were taken. We only had to do a minimal amount of concealing as she has lovely skin and an HD powder was used to set the foundation and concealer. I then went in with a mid toned neutral brown and filled in her natural brows then set them with a brow gel. Nicole has amazing blue eyes and we wanted to create a neutral everyday look so I used a bronze toned eyeshadow all over the lid, to make the blue pop. The a deep brown was used in the outer V and it was all blended together. I used a champagne toned highlight under her brow bone and in the inner corner of her eyes. I then used a false lash and cut it in half. I used half of the lash in the outer corner to keep the look natural but to enhance the eyes shape. We then softly contour with a matte bronzer and we also applied it around the edges of the face to create a warm natural tan/glow. This is just to make the skin look healthy and give it more dimension. I then used a soft peach toned blush and applied to the apples of her cheeks. To give the look an extra pop we used a reddy orange lipstick and the make up was complete. I then softly curled her hair to give it a romantic everyday look. We were really pleased with the result and the photos really did justice to her look. Let me know if you liked this post and I'll try to do more like it! Nicole xx 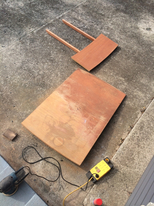 This months DIY is super exciting! It's a table renovation. I have been wanting a dining table for a while but I wanted one that I could buy for super cheap and do up myself. I came across this one on Trade Me and ended up getting it for $2.00. I am also going to be doing a DIY on some table decorations so keep an eye out for that. The table was in pretty poor condition when I got it (have a look at the before and after pictures at the end of the post!), it was very sturdy though. The top had a little water damage to it so I wasn't sure how it would come up. The majority of it was ok though. So to begin I sanded it right back, the legs were already sanded so I lightly sanded them and used an electric sander with an P80 sanding sheet. This didn't take too long as the top part had areas that were sanded back and areas that had paper stuck to it and other issues! But all in all it look about half an hour. The table also has two extenders that I managed to take completely off and this made life so much easier! 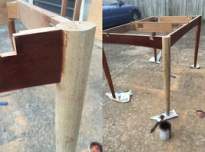 Next up I cleaned the entire table! I wiped off all the excess dust from sanding and some cobwebs and other bits! When I was finished doing this I started to varnish. I used the Monocel Interior/Exterior Stain and Varnish in Jarrah. I brought a pot of this ages ago because it was the cheapest and darkest one that I could find. But I've found that I love it! It's so light in texture that it blends out easily and the colour is so dark and rich. I've used this varnish on all the DIYs I've done around the house and they look great.  I then continued to make my way through the rest of the table pieces until I was all done. The table top that has the damage didn't end up being able to sand down well so it was still pretty noticeable after varnishing. I think I'll just have to work out a way to display it so you just don't notice! I left it over night to dry then put it all together and it's as simple as that! I ended up buying this table for $2.00, the varnish was left over from a DIY I did a month ago, I brought around $10.00 worth of sanding gear so all up the table renovation cost me under $15.00. Now the hunt begins for chairs!! Nicole xx 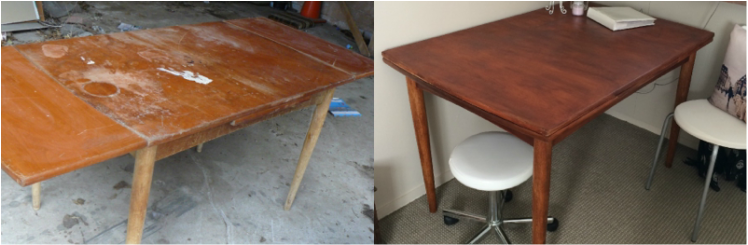

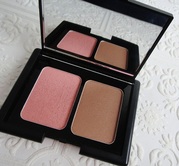 For the first post in my new Top Five Friday's I'm going to be talking about blush. Here's my five favourite blushes in no particular order. ELF Cosmetics St Lucia Duo Blush I'm not sure if this blush has a name itself but it comes in a handy little duo with a Bronzer. This blush is a peachy pink with tiny specks of gold shimmer (but nothing that shows up in a big way on the cheeks) which give another dimension to the blush. I like this blush because it's such an easy colour to wear as it goes with absolutely any lip and eye look I create and it just adds a really nice soft flushed looked to the skin. It's not overly pigmented which I don't mind as you can't be too heavy handed with it. 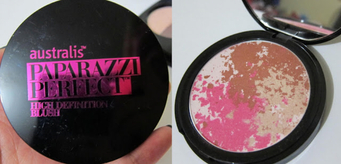 Australis Paparazzi Perfect HD Blush in Flash It This was my first Australis blush and it is so beautiful. These blushes are do buttery soft and such high quality. This particular one has a champagne highlight colour, a mid toned Bronzer and an almost hot pink. These colours can be used separately or together. Swirled together this is such a beautiful summer blush, it's bright but not over the top. It wears really well and I just absolutely love it. I have also got Screen Siren which is a darker more winter toned blush. 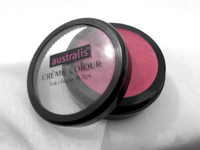 Australis creme Colour in Dusky Rose This is quite a dark blush so definitely used sparingly! This is a lovely creamy blush that's easy to blend and highly pigmented. It's a deep reddy pink that blends out to a flushed tone, it can be worn heavier to create a darker appearance. This is my go to Winter blush and I find it lovely to use and has great staying power 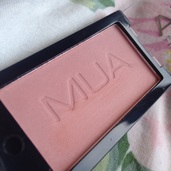 MUA Blush in Cupcake This blush is so cheap!! It's around $2.00 so I had pretty low expectations for it. However it is lovely. Its really pigmented and is easily layered. It is a peach tone with a pink undertone. It transfers really peachy on my skin and i just love it. If you use it softly it creates a real soft peach glow, if you layer it it creates a nice peachy tone that blends into any bronzer easily. I think if you have yellow undertones this blush is really natural looking and it's a really nice Summer shade. 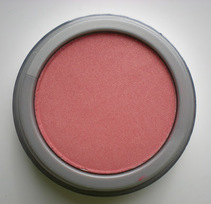 Jordana Blush in Coral Sandy Beach So as the name would suggest this is a coral coloured blush. This blush is AMAZING!! This is my 100% go to Summer blush, it goes with any look I create and it wears beautifully. This is another cheap blush, costing around $4.00 but it is so beautifully pigmented and buttery to the touch. I even brought an extra one for my kit and I find that this is my most popular Bridesmaid colour. It suits every colour skin tone and if you have a Jordana counter near you I highly recommend you go and swatch it, you won't be disappointed. I have just realised that I only have drugstore blushes so I might have to invest in some High End ones to give them a try! Let me know what you think of the new Top Five posts I'm going to be doing and if you have a
 About a month ago I purchased the book #GIRLBOSS by Sophia Amoruso, who is the Founder and CEO of Nasty Gal. I had heard alot of hype about this book so really wanted to read it and see what all the fuss was about. This book isn't a traditional Self Help book, it's written more as a life guide and basically tells you how Sophia has navigated her way through numerous obstacles and created a really amazing business. She started from the absolute bottom, homeless and 'dumpster diving' to becoming the CEO of a multi million dollar company and the way she got there is really inspirational. It begins right back when she started Nasty Gal and how brought second hand clothing and styled it, in such a way that it would sell really quickly and for a profit. You then follow her journey to when she comes successful on eBay and moves on to starting her own website and employing her own staff. The way she writes (and I can imagine talks) is quirky and straight to the point. She is a no messing around kind of woman and doesn't take the decisions she makes lightly. I love the way you watch her business grow, as well as herself and the way she develops the business into what it has become is really inspiring. While I am making this book sound like it's a really heavy, serious read it's really not. The way it's written is easy to read and also really enjoyable. She has heaps of little quotes and pictures that capture the moment really well and you can not finishing reading this book without feeling completely inspired. I highly recommend this book! Nicole xx 
I thought I would do a mini review and look using my new That's Heart palette, I'm also going to do another post doing a more creative look, using the colourful shades in the palette. This palette was created by BH Cosmetics, they have a great range of reasonably priced make up and I've noticed that their palettes are in a lot of Make Up Artists kits as they have such a big range of colours. 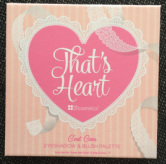 This palette is called 'That's Heart' and it was created with Youtube Beauty Guru That's Heart. I absolutely love the packaging. I'm not a pink girl but I think the packaging is so sweet and soft, they wanted the palette to have 'sweet and romantic' colours and this (along with the colours) 100% fits the bill. It is basically a really thick cardboard outer with a magnetic closer. The back has a small blurb about the palette and That's Heart. The inside of the palette has all the products in little circle compartments surrounded by drawn on lace. It also has a big mirror that I didn't photograph, but it is more or less the same as the outside but the heart is a mirror. This palette is so slim and it contains almost everything you would need to create a multitude of looks. It would be the perfect palette to travel with and it's got to be one of the cutest palettes I've seen! 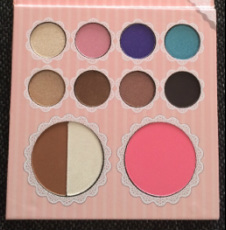 This palette contains 8 eyeshadows, a blush, bronzer and highlighter. The eyeshadows are all shimmers but the blush and bronzer and both matte. To create the look below I used the first eyeshadows on the second row and applied it all over the lid, I then put the second colour on the second row into my crease and blended them together. I then put a little of the third colour on the second row into the outer v and along the lower lash line. I used the first colour on the first row as an inner corner highlight. I then applied heaps of mascara and that was it for the eye look! I found that the eyeshadows has a little fall out but are really pigmented and blend together well. The look I created was really soft and natural and I was happy I could create a look like this with this palette. I also used the blush, bronzer and highlighter. The blush is such a stunning colour. It's not excessively pigmented so is easy to apply and blend. It comes out a really soft natural flushed colour. The bronzer is extremely pigmented. You need to use a really light hand with this and I found the half circle shape was a bit of a pain to get the brush in. The product it self was lovely and is definitely build able to create either a strong or soft contour. The highlight was really pretty and has a yellow undertone so I really liked it on my skin. I also used the BH Cosmetics lipstick in Vixen that I brought at the same time as the palette. All in all I really like this palette and I think for the price it's definitely worth it. Keep an eye out for the creative look I create with this palette using that gorgeous navy and turquoise. Nicole xx 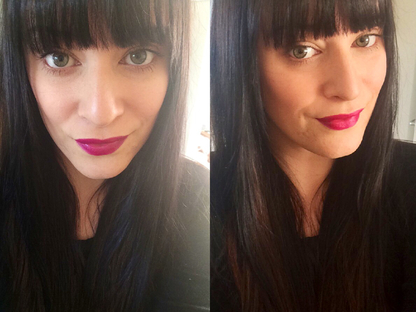
|
Fashion, Beauty and MeAn insight into the life of a Hairdresser, Make Up Artist and Fashion Junkie  Categories
All
Archives
September 2016
|
 RSS Feed
